How to use DI Slides to add images to your website
The DI Slides plugin allows you to manage rotating banner images that appear on your homepage or other designated sliders across your website. Slides can promote events, incentives, service offers, or general announcements.
This guide walks through how to create a new slide, assign it to a slider, configure its behavior, and publish it live on your website. For advanced slider configuration or creating new slider containers, refer to the related Help Center articles.
In this article, you’ll learn how to create a slide, upload desktop and mobile images, customize slide behavior, control display settings, publish your slide, and manage existing slides.
To get started
Go to the Cars.com Hub. Click Dealer Inspire, then Manage Website.
1Navigate to slides
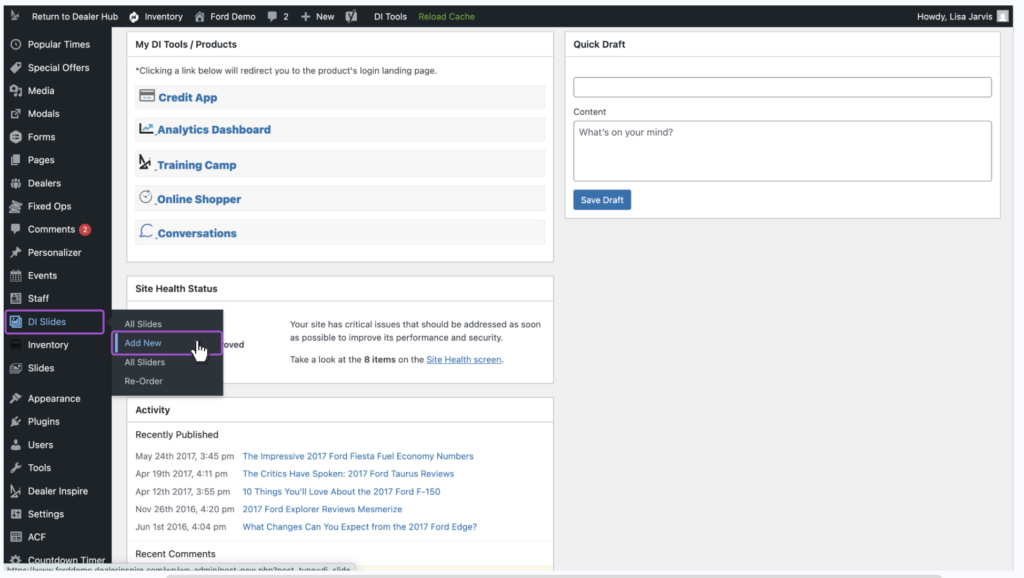
In the backend of your Dealer Inspire website:
- Locate DI Slides in the left-hand menu.
- Click Add New.
You will be taken to the slide creation screen.
2Set up your slide
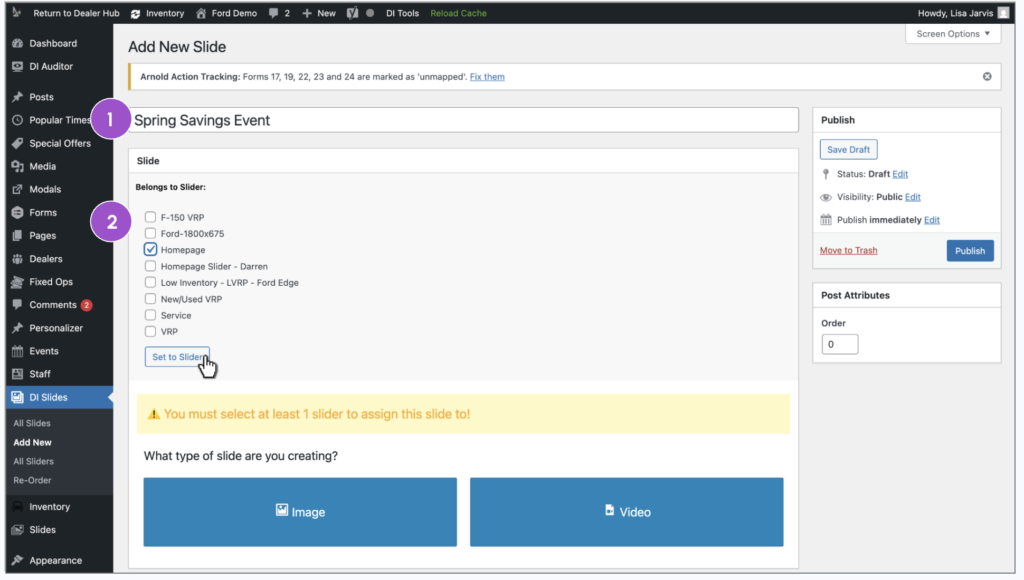
Before adding images, you must configure the slide container.
- Add a slide label.
- This is for internal reference only and will not appear on the frontend.
- Use a clear, descriptive name (for example: “June Service Special 2026”).
- Assign the slide to a Slider.
- Locate the Set to Slider section.
- Select the slider where this slide should appear.
- Click Set to Slider.
Think of the slider as the container and the slide as the individual image inside it.
In most cases, slides are added to the homepage slider. If you need to create a new slider container, refer to the related DI Slides article.
The slide will not display on the frontend unless it is assigned to a slider.
3Add your your slide images
- Click the Image button.
- You will be prompted to upload both desktop and mobile images.
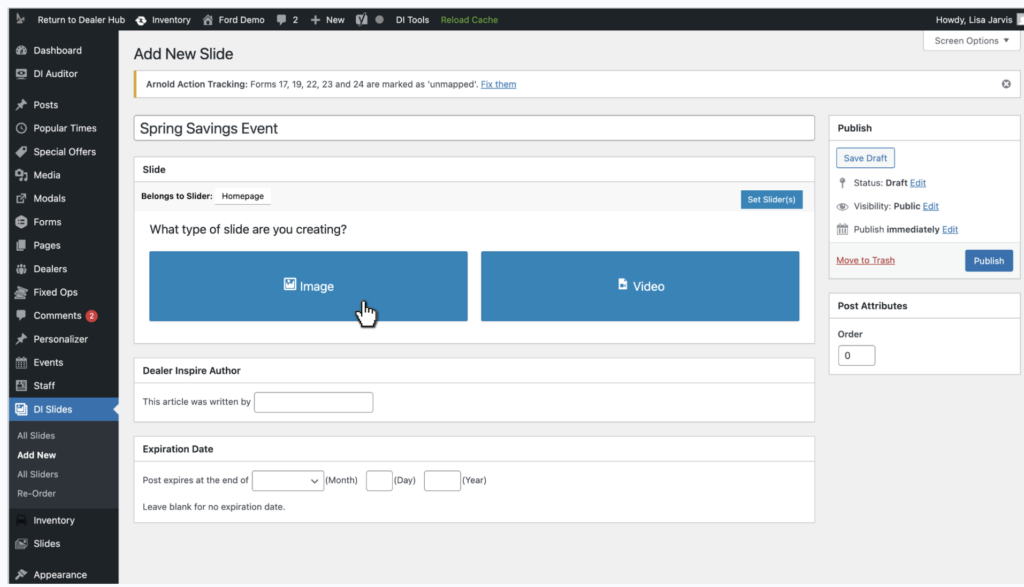
- Click Choose Desktop Slide Image.
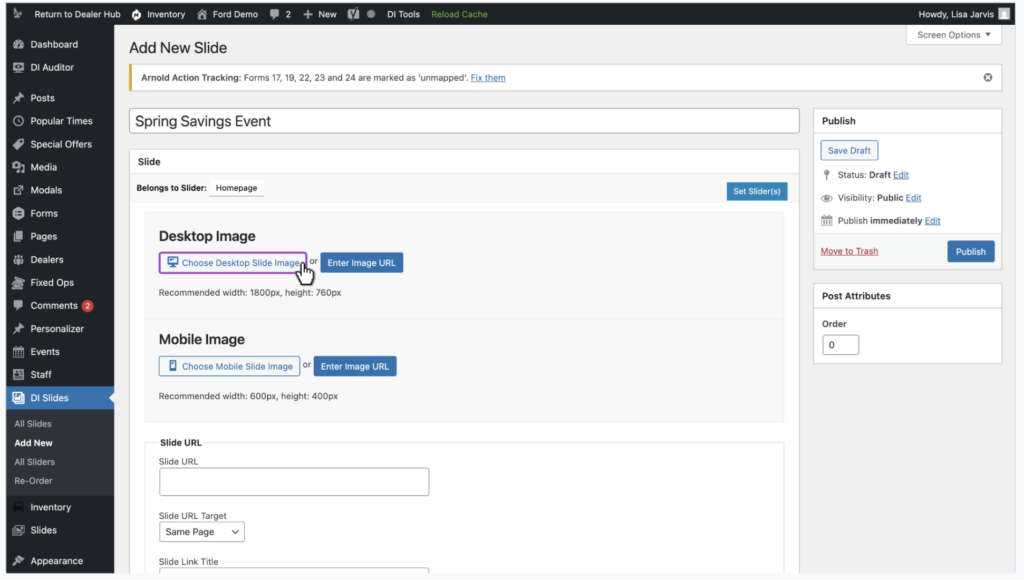
- Upload a new image or select one from your media library.
- Click Select.
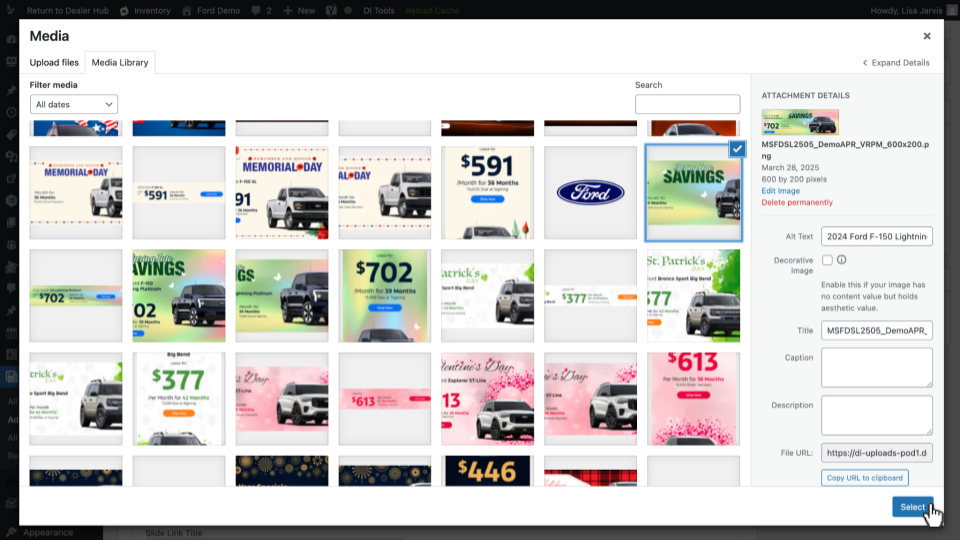
When a desktop image is added, it will automatically apply to mobile.
However, it is recommended to upload a properly sized mobile image to ensure:
- Faster load times
- Proper cropping
- Better mobile display
To replace the mobile version:
- Click Change Mobile Slide Image.
- Upload or select a resized mobile image.
4Customize slide behavior
After images are added and the slide is assigned to a slider, configure how it behaves.
- Add a URL you’d like the slide to route to when clicked.
- Determine if you’d like the click to open in a new tab or the same tab.
- Add text describing your slide
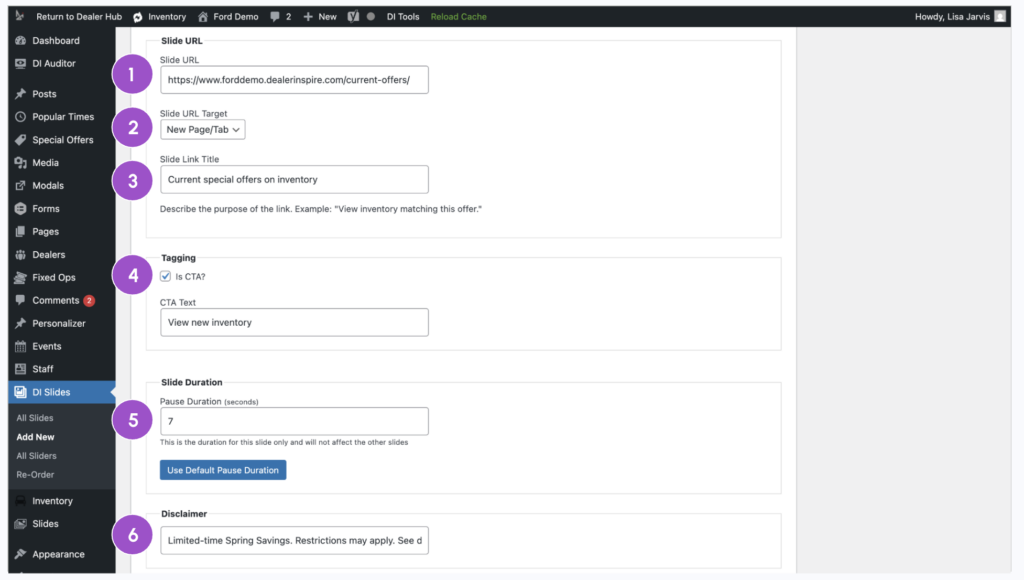
- Add a CTA to the slide. This is optional. Depending on how busy your slide is or if there is already a button on the image, it is best to leave this unchecked. If selected, add what you’d like the button to say.
- Customize pause duration to decide how long you’d like the slide to stay on the screen before automatically rolling to the next slide.
- Include a brief disclaimer (optional).
5Adjust your slide settings
The last few details are optional, but allow you to have full control over how, when, and where the slide appears to your visitors.
- Enter a number to set the order this slide appears in rotation with your other slides.
- Determine if you’d like this slide to appear on both Desktop and Mobile, or just one.
- Check the box if you’d like to disable the user’s ability to click past this slide.
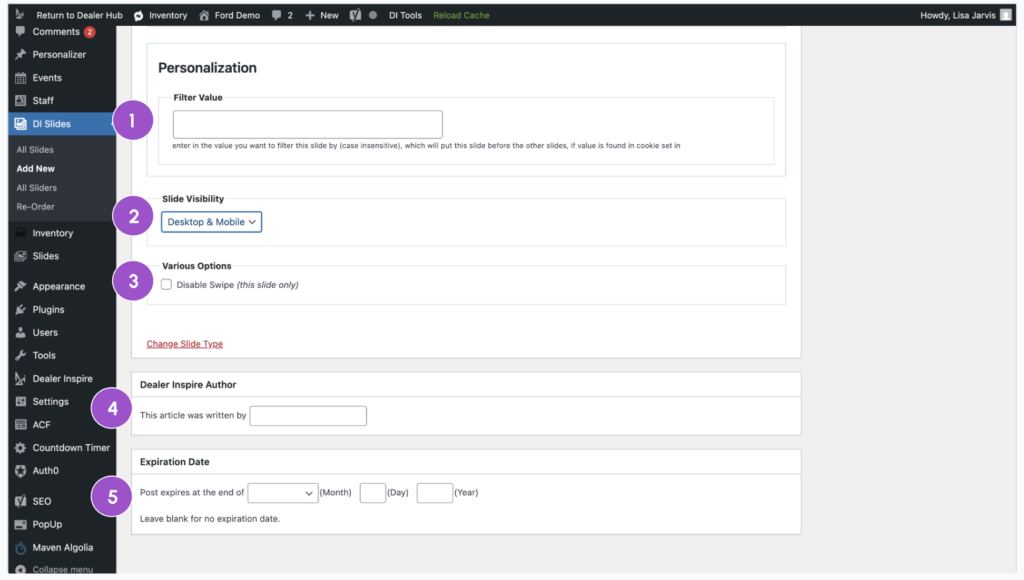
- Add your name as the author to help track and organize backend updates.
- Add an expiration date so you can set it and forget it.
6Publish your slide
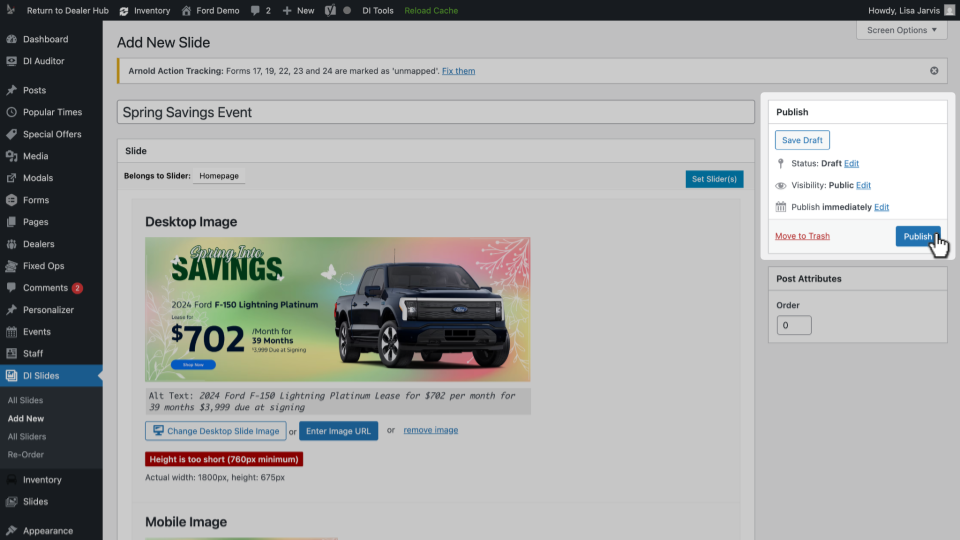
- Scroll to the top of the page.
- Click Publish.
If not ready to go live, click Save Draft instead.
If set to Publish Immediately and assigned to a slider, the slide will appear on the frontend once cache is refreshed.
After publishing:
- Use Reload Cache in the top admin bar (if available).
- Visit the frontend.
- Confirm:
- Images display correctly
- Links work
- Slide order appears as expected
- Mobile display functions properly
- Images display correctly

7Manage existing slides
To view and manage slides:
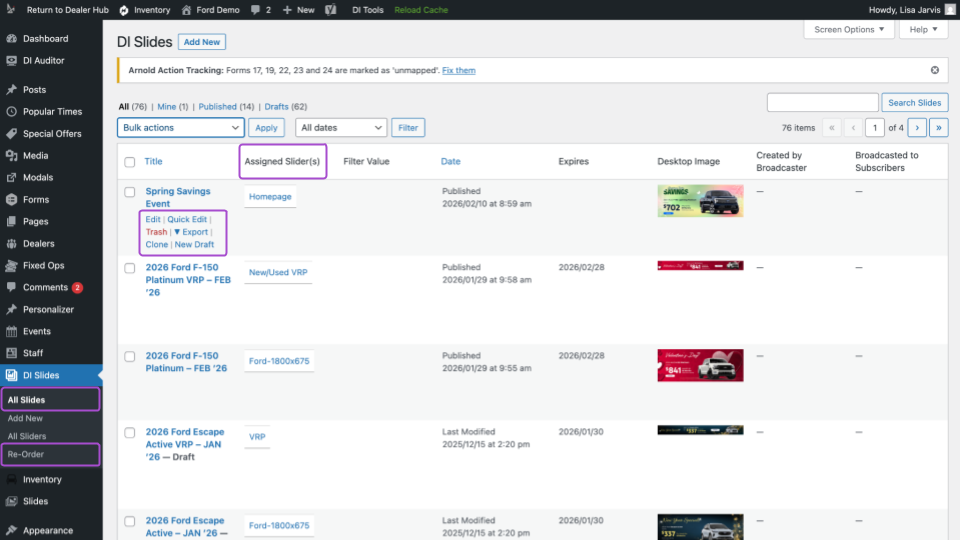
- Click DI Slides.
- Select All Slides.
From here you can:
- Edit slides
- Delete slides
- Clone slides
- Confirm slider assignments
To adjust slide rotation order:
- Click Re-Order under DI Slides in the left menu.
- Drag and drop slides into your preferred order.
- Save changes if prompted.
Reordering affects display sequence within the selected slider.